Challenge 1: Create a static HTML web app in Azure
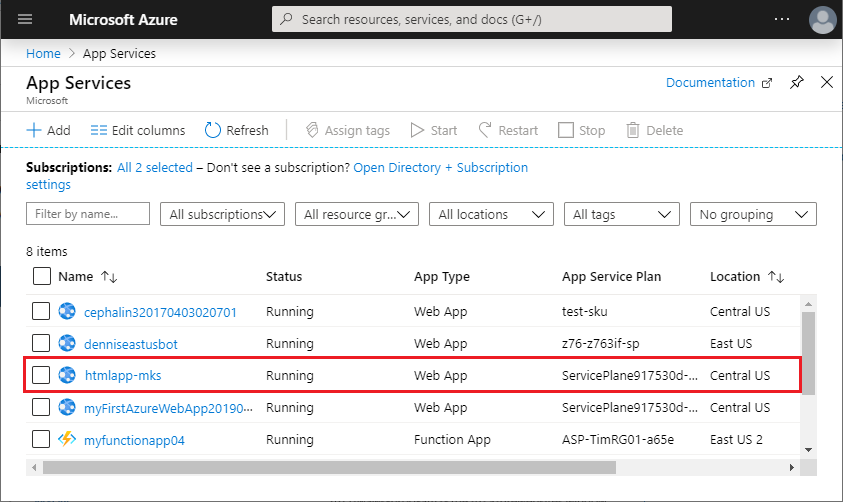
Azure App Service provides a highly scalable, self-patching web hosting service. This quickstart shows how to deploy a basic HTML+CSS site to Azure App Service. You'll complete this quickstart in Cloud Shell, but you can also run these commands locally with Azure CLI. If you don't have an Azure subscription, create an Azure free account before you begin. Use the Bash environment in Azure Cloud Shell. For more information, see Azure Cloud Shell Quickstart – Bash. If you prefer to run CLI reference commands locally, install the Azure CLI. If you are running on Windows or macOS, consider running Azure CLI in a Docker container. For more information, see How to run the Azure CLI in a Docker container. If you're using a local installation, sign in to the Azure CLI by using the az login command. To finish the authentication process, follow the steps displayed in your terminal. For additional sign-in options, see Sign in with the Azure CLI. When you're prompted, install Azure CLI extensions on first use. For more information about extensions, see Use extensions with the Azure CLI. Run az version to find the version and dependent libraries that are installed. To upgrade to the latest version, run az upgrade. In the Cloud Shell, create a quickstart directory and then change to it. Next, run the following command to clone the sample app repository to your quickstart directory. Change to the directory that contains the sample code and run the az webapp up command. In the following example, replace with a unique app name. Static content is indicated by the The Create a default resource group. Create a default app service plan. Create an app with the specified name. Zip deploy files from the current working directory to the web app. This command may take a few minutes to run. While running, it displays information similar to the following example: Make a note of the In a browser, go to the app URL: The page is running as an Azure App Service web app. Congratulations! You've deployed your first HTML app to App Service. To manage the web app you created, in the Azure portal, search for and select App Services. On the App Services page, select the name of your Azure app. You see your web app's Overview page. Here, you can perform basic management tasks like browse, stop, start, restart, and delete. The left menu provides different pages for configuring your app. Instructions: Use the App Service Editor to add text to your static website. Google it!!! 🙂 An easier way to edit files now exists with the App Service Editor (Preview) Just as with Kudu, there are two ways to launch the App Service Editor. From the browser, if the Kudu URL is https://mysite.scm.azurewebsites.net To launch the App Service Editor from the portal, scroll down to the Development Tools section on the left-hand navigation properties and click App Service Editor (Preview). Within the App Service Editor (Preview) blade, click Go. A new browser tab appears with a web-based IDE opened to the WWWROOT folder of your app. At first glance, it looks like Visual Studio Code Editing a file is as simple as opening it and making the edits. App Service Editor (for better or worse) auto-saves your changes as you work and publishes them automatically. Everything you do is happening live on the site. This model is good for simple edits, but if you need to make changes to multiple files at once then publishing via Visual Studio Create a static HTML web app in Azure

Prerequisites
Download the sample
mkdir quickstart

cd $HOME/quickstart
git clone https://github.com/Azure-Samples/html-docs-hello-world.git
Create a web app
--html flag.cd html-docs-hello-world
az webapp up --location westeurope --name --html
az webapp up command does the following actions:
{
  "app_url": "https://.azurewebsites.net",
  "location": "westeurope",
  "name": "",
  "os": "Windows",
  "resourcegroup": "appsvc_rg_Windows_westeurope",
  "serverfarm": "appsvc_asp_Windows_westeurope",
  "sku": "FREE",
  "src_path": "/home//quickstart/html-docs-hello-world ",
  < JSON data removed for brevity. >
}
resourceGroup value. You need it for the clean up resources section.Browse to the app
http://.azurewebsites.net.
Manage your new Azure app


Challenge 2 – Let’s customize it.
App Service Editor
 . As stated above, this is a web-based editor for modifying files already deployed to Azure Web Apps. You can see all the files on your site quickly through the file explorer.
 , you can add a /dev token. The root URL comes https://mysite.scm.azurewebsites.net/dev
  .
. running in the browser, but it is the Monaco editor.
 or Git-based deployment
  is a better solution.


