DevOps 2.0 Challenges Guide

Challenge 1: Establish your plan

In order to have a successful DevOps strategy, your team needs to have a plan.
**Resist the initial temptation to rush on the keyboard! This is the time to pause and think as a team 
about your end-to-end deployment process that you would implement in this company.**


Challenge

Your challenge is to organize your team and establish a high level view of the workflow that you will 
implement during the rest of the event to achieve zero downtime deployment.
Based on your knowledge of the application and its architecture, your team must establish the 
fundamental processes that need to be followed in order to go from code to production. You are 
expected to focus only on a basic integration and deployment mechanism that takes into consideration
 the architecture of the application.
Get familiar with the basic building blocks of a successful DevOps workflow and be aware that your 
current plan may change over the course of the event.
This is a good time to think of the following aspects:
– Each API will potentially have a different life cycle.
– Your process should aim at minimizing the time it takes to deploy a feature into production.
– You want to be able to prioritize your tasks.
– Small changes are easier to deploy.


Success Criteria

Present your workflow and initial organization of the team that you have collectively agreed on to your 
coach. Take time to explain in detail how you aim to validate one phase before you move to the next 
one.
Be ready to answer the following questions:
– What aspects of DevOps are you implementing?
– How are you splitting the work amongst the team?
– How do you keep track of your work in progress?
– How will you communicate amongst the team (Verbal, Teams, Slack, etc.)?
Your coach will discuss your process before unlocking the next challenge.


References

 
Getting Started
There are numerous options for managing source code during this OpenHack and in other DevOps 
activities. Many choose GitHub because of its relationship to Open Source, however the advanced 
DevOps, security and inner source capabilities may also help with your decision. Some will choose 
Azure DevOps, or a combination of GitHub and Azure DevOps. And others may choose other tools 
for work management, source control and/or CI/CD.
> **Note:** If using GitHub or Azure DevOps, public repos and projects are recommended for the 
OpenHack as they offer additional benefits (*e.g.* additional concurrent CI/CD jobs, etc.)
– GitHub
    – Setting up Git
    – Managing work with GitHub Issues and GitHub Projects
– Azure DevOps
    > **Note:** You may have to review the permissions of each member of your team at the organization and project level.

Challenge 2 – Setting up development workflow

**Resist the initial temptation to rush to the keyboard! This is the time to pause and think as a team 
about your end-to-end deployment process that you would implement in this company.**
**Reminders:**
– Use an **InPrivate/Incognito** window in your browser to avoid any confusion with any other 
credentials that you may use to access Azure resources.
– The credentials you need to access the Azure subscription assigned to your team are available on the
 **”VIEW LAB ENVIRONMENT”** tab. Additional credentials for your teams deployed resources can be 
obtained following the instructions on the Overview tab under the section “Cheat sheet for the 
DevOps OpenHack”.
– Once you have configured your Git repository you may see **security alerts** if you are an 
administrator in your GitHub organization. Do not be alarmed, these are intentional and you will be 
required to resolve security issues in a later challenge.
————–
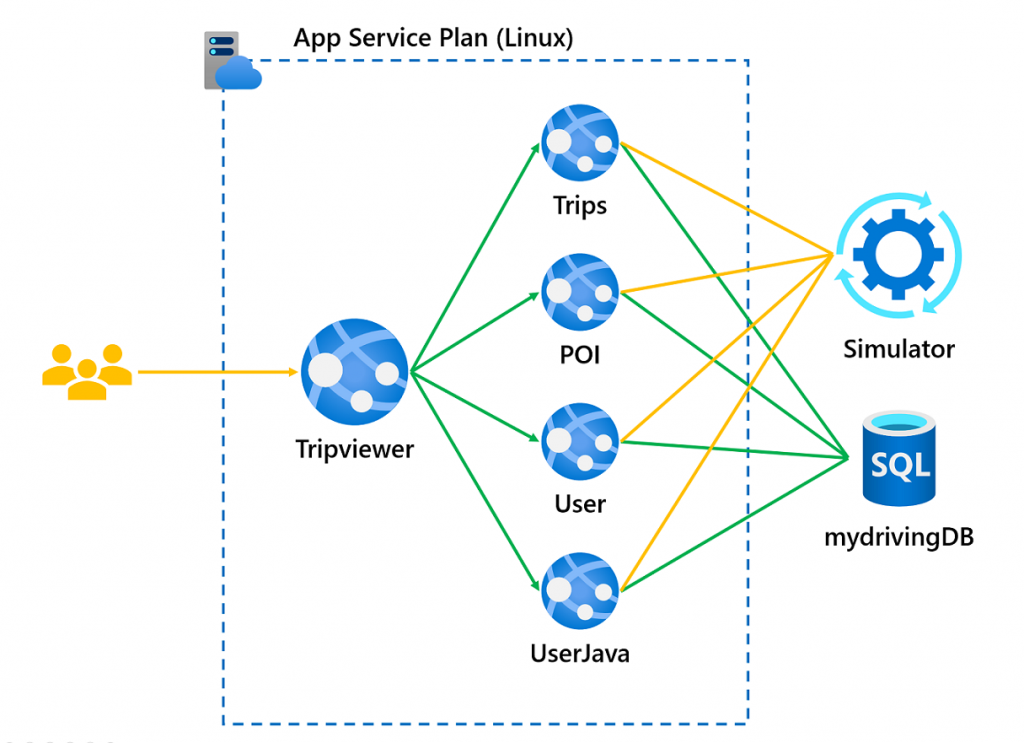
Prior to the event, the full solution was deployed to Azure with the following resources:
– A single Azure App Service on Linux service plan
– The team website, **Tripviewer**, that your customers are using to review their driving scores and 
trips which are being simulated against the APIs
– Four APIs each deployed to their own Azure Web App for Containers instance which is associated 
with the existing App Service plan
– A single Azure SQL server and database which host a database named **mydrivingDB**
The architecture is depicted in the following diagram:

The code and tests for the APIs are available in the following GitHub repository:


Challenge

Select the tooling that best fits your team's skills or learning plans, and configure and implement the 
mechanisms that will form the basis of the development workflow. You will need to set up the 
mechanism to link the code changes to your backlog, to prevent people from directly changing the code
 in your main branch without peer-reviewing (including code ownership for to establish mandatory reviewers). **You are not expected to
 touch the code, nor automate the build process**; this will be required in the next challenge.
Create your own code repository either by forking the provided repo on **GitHub** or import into 
**GitHub**. Your repository **must** be public.
>**Note:** Downloading and extracting an archived version of the repo locally (instead of forking) if 
you are following the GitHub route may be beneficial as it will narrow down the choices that your team 
will need to make when you are in the process of creating Pull Requests against your default branch.
If you choose to use Azure Pipelines, you will later be required to establish automatic links between a 
given build and its corresponding work items. Likewise, if you prefer to use GitHub Actions you will be 
expected to link your work items to commits as well.
**You are expected to work on all the APIs of the MyDriving application.**
**Reminders**:
– If you choose to use Azure Pipelines, be sure that when you create your Azure DevOps project, it is 
setup as a public project to unlock the ability to use up to 10 concurrent build agents.
– The following tools have been tested with this challenge:
    – Version Control
        – **GitHub**
    – Work Management
        – **Azure Boards**
You are expected to implement a policy to enforce that code changes submitted are required to go 
through a peer review and formal approval process, since the repository contains four APIs, code 
ownership should be defined per API; it should be mandatory the owner(s) review the code.


Success Criteria

– Demonstrate to your coach that you have implemented a branch protection policy to prevent any 
code changes from being committed to the `master` branch without being reviewed. The policy must 
require at least two reviewers including a code owner(s) review.
– Demonstrate to your coach that you have defined code owner(s) for each of the services.
– Demonstrate to your coach that you can or have linked a work item with associated code changes.


References

A **Cheat sheet** for the DevOps OpenHack is available at the end of the **Overview** page.
 > **Note**: Continuous Integration (CI) uses best practices including automated testing and ideally 
trunk-based development. Automated testing will be covered later and will extend the CI setup 
completed here.
 
Work Management
– GitHub
    – Managing work with GitHub Issues and GitHub Projects
– Azure DevOps
 
Branch protection
– GitHub
– Azure DevOps
    – Code Reviewers
 

Challenge 3: Implement continuous testing

**Resist the initial temptation to rush on the keyboard! This is the time to pause and think as a team 
about your end-to-end deployment process that you would implement in this company.**
**Reminders:**
– Use an InPrivate/Incognito window in your browser to avoid any confusion with any other credentials 
that you may use to access Azure resources.
————–
Regardless of how carefully you write and review code, workflow automation not only increases velocity
 but also helps you avoid one-off issues, regressions and the “works on my machine” phenomenon.


Challenge

You are expected to create workflows to automate the **building, unit testing and packaging** of at 
least one of the APIs of your application. You are not required to publish code coverage reports or 
resulting packages. Instead, focus exclusively on executing existing unit tests as part of your workflows.
 Carefully review the Readme for chosen API as it may contain additional instructions.
>**Note:** When selecting GitHub Actions, Azure DevOps Tasks or Jenkins Plugins; be prudent and 
select ones that were created by the vendor as a first choice. If you are going to use a third party 
option make sure that you verify that you are able to satisfy the success criteria with your selection.


Success Criteria

– With your coach present, execute the automation workflow and explain each step.
– Demonstrate that the workflow is triggered for an API, only when changes are made to code for that API.
– Demonstrate that the workflow(s) augment existing branch protections, by performing verifications 
before a Pull Request (PR) can be merged to your protected branch.
– Demonstrate that your pipeline runs, performs all of the required steps and then ultimately prevents 
the merging of the code when the workflow fails.
– Demonstrate that your workflow creates and issue/bug in your backlog for each failed build
> **Note:** You are required to make a change that will cause on of your unit tests to fail. If you are 
uncertain, your coach will provide a breaking change to submit through your pipeline.


References

A cheat sheet for the DevOps OpenHack is available at the end of the **Overview** page.
 
Workflow orchestration
– GitHub:
    – GitHub Actions
– Jenkins:
 
Unit testing

Challenge 4: Implement continuous deployment (CD)

**Resist the initial temptation to rush on the keyboard! This is the time to pause and think as a team 
about your end-to-end deployment process that you would implement in this company.**
**Reminders:**
– Use an InPrivate/Incognito window in your browser to avoid any confusion with any other credentials 
that you may use to access Azure resources.
————–
Now that you have successfully implemented continuous integration, it is time to show that you can 
deploy the container images that you have built for each of the four APIs to Azure App Service.
The code and tests for the APIs is available in the following GitHub repository:
Before you joined the event, **each** API of the MyDriving application was built and deployed to an 
existing Azure Container Registry using the following scripts:
– POI API deployment script
    “`sh
    echo “Building API-POI image…”
    echo “Changing directory to $GITOHTEAMDIRPATH/apis/poi/web…”
    cd “$GITOHTEAMDIRPATH/apis/poi/web”
    az acr build –image “devopsoh/api-poi:${BASEIMAGETAG}” –registry $ACRNAME –file Dockerfile .
    “`
– Trips API deployment script
    “`sh
    echo “Building API-TRIPS image…”
    echo “Changing directory to $GITOHTEAMDIRPATH/apis/trips…”
    cd “$GITOHTEAMDIRPATH/apis/trips”
    az acr build –image “devopsoh/api-trips:${BASEIMAGETAG}” –registry $ACRNAME –file Dockerfile .
    “`
– User API deployment script
    “`sh
    echo “Building API-USERPROFILE image…”
    echo “Changing directory to $GITOHTEAMDIRPATH/apis/userprofile…”
    cd “$GITOHTEAMDIRPATH/apis/userprofile”
    az acr build –image “devopsoh/api-userprofile:${BASEIMAGETAG}” –registry $ACRNAME –file Dockerfile .
    “`
– User-Java API deployment script
    “`sh
    echo “Building API-USER-JAVA image…”
    echo “Changing directory to $GITOHTEAMDIRPATH/apis/user-java…”
    cd “$GITOHTEAMDIRPATH/apis/user-java”
    az acr build –image “devopsoh/api-user-java:${BASEIMAGETAG}” –registry $ACRNAME –file Dockerfile .
    “`


Challenge

Using the tooling that you have implemented so far, you must deploy each of the four APIs to your 
existing Azure App Service using Continuous Delivery (CD), but before you are able to deploy you will 
need to push the images to a container registry. Configuration steps will differ depending on whether 
your team decides to use Azure Container Registry or GitHub Packages to store your images.
**Reminders:**
– The image tag should take the format of:
    – If using Azure Container Registry
        – `/:` where the `ACR_repository_name` follows the naming convention `devopsoh/:`.
    – If using GitHub Packages
        – `docker.pkg.github.com///:` where image name should be the images you are building (eg: `api-trips`)
        – Tip: GitHub Actions provides you with a set of predefined variables that can help you
– The following tools have been tested with this challenge. You may use any other set of tools however
 the coaches will only be able to provide limited guidance:
    – Orchestrators
        – **GitHub Actions**
        – **Jenkins**
    – Version Control
        – **GitHub**
    – Docker Registry
        – **Azure Container Registry**
        – **GitHub Packages**


Success Criteria

Your coach will provide you with an update to your APIs. You must demonstrate that you can reference 
the deployment of these API updates with the corresponding work items.
Demonstrate to your coach that in your build/workflow:
– The container images (one per API) are published to the registry of your choice (only when building 
`master` but not on PRs).
    > **Note:** Your publish process should not overwrite the existing image with the *latest* tag, so 
consider how you will insure unique values for image tags.
– The API(s) code is deployed to the Azure App Service every time code is pushed to master (if the code
 compiles and all tests pass, but only when building `master` branch).
    > **Note:** Your branch/pull request policy can be used to enforce workflow and gates between CI 
and CD activities.


References

– Continuous Delivery
– Github
– Azure Pipelines
– Docker Registries

Challenge 5: Implement a Blue/Green deployment strategy

**Resist the initial temptation to rush on the keyboard! This is the time to pause and think as a team 
about your end-to-end deployment process that you would implement in this company.**
**Reminders:**
– Use an InPrivate/Incognito window in your browser to avoid any confusion with any other credentials 
that you may use to access Azure resources.
————–
Classic deployment mechanisms require downtime. And if something goes wrong, you need to rollback 
or otherwise remediate the broken deployment.
A blue/green deployment strategy involves having two environments and shifting traffic between them. 
Blue or green can be your current version with the other being the proposed next version. This allows 
you to 'instantaneously' shift between versions without downtime. In addition, if there is an issue with 
the new version, rolling back simply requires reverting traffic to the previous deployment.
In the previous challenges, your team implemented workflow(s) for continuous integration, testing, and 
deployment to a container registry. You also verified that updated container image was deployed and 
running in each API's respective web application. In this challenge you'll extend that capability to 
perform a Blue/Green deployment into your existing Azure App Service.
> **Note:** Blue/Green deployment is different from flighting, canary testing and progressive 
exposure; those are covered in in another challenge.
Before swapping the Blue and Green environments, ensure that the destination environment is online 
and available. Two scripts (one in bash and the other in PowerShell) can monitor the response code of 
your APIs during the deployment process.
> **Note:** Additional gates (e.g., manual approval) which may be desired before switching are 
excluded in this challenge but may be implemented in another challenge.


Challenge

Leveraging your selected orchestration tool, update your existing workflow(s) to automatically perform 
Blue/Green deployments into Azure.
Think about your strategy as a team before you start developing your solution.


Success Criteria

To successfully complete the challenge, implement Blue/Green deployments for each of the APIs. Your 
coach will give you a change to push through your pipeline to test your strategy.
– Demonstrate that a code change in an API is deployed initially to a staging environment and 
automatically to production with “zero downtime.”
– Explain to your coach the logic that you are using for blue/green deployment and address the 
following points:
    – Describe the mechanism that validates that the container and web app is ready
    – Demonstrate that you are able to perform a rollback to the previous version
    – Demonstrate what triggers or constraints are used to determine when/whether it is safe to swap 
to the new version
    – Demonstrate how you manage the version of each container image that is deployed
    – Demonstrate the mechanism for determining which version of your code should be in production 
(blue) and which should be in staging (green)
    – Demonstrate which resource optimizations are performed once the deployment is complete
        > **Note:** this could be any optimization, including but not limited to restricting traffic flow to 
non-production slots or shutting the slot down altogether.
    – Demonstrate how configuration secrets are being managed


References

Challenge 6: Implement a monitoring solution for your MyDriving APIs

**Resist the initial temptation to rush on the keyboard! This is the time to pause and think as a team 
about your end-to-end deployment process that you would implement in this company.**
**Reminders:**
– Use an InPrivate/Incognito window in your browser to avoid any confusion with any other credentials 
that you may use to access Azure resources.
————–
With a functional pipeline that builds and deploys your APIs, your next step is to focus on their health 
and performance.


Challenge

Your challenge is to define and implement a monitoring strategy for your APIs.
Carefully select the monitoring tool(s) that you want to use.
You are expected to achieve the following goals:
– Implement a solution that monitors the health and performance of your APIs. You will have to collect 
data regarding the performance of your web applications and the APIs hosted in each web application.
– Define the performance baseline for the APIs running in Azure and implement a mechanism that will 
automatically raise an alert and create an incident in your work item tracking system if a performance 
degradation is observed.
– Build a dashboard that will allow you to visualize the global health of your environment.
> **Note:** It is recommended to discuss the capabilities of the tools that you have selected with your
 team. Keep in mind that your coach is here to help you make an educated decision.


Success Criteria

Show your coach the aggregated view of your application and infrastructure that includes the following:
– Web application monitoring that displays the CPU utilization for each production web application
– The average response time over a period of 1 minute for each production web application
– A work item is created when API performance degradation is observed
– The top 10 queries by duration over the last 24 hours for the **mydrivingDB** database
– The percentage of DTU utilized on the **mydrivingDB** database
Show to your coach that an incident is automatically created when an alert is raised.


References

Azure resources
– **Azure Monitor**
– **Azure Logic Apps**
– **Kusto documentation and references**:
    – The solutions in Azure will evolve to use Azure Data Explorer query language (also know as Kusto)
    – Syntax for regular expressions supported by Azure Data Explorer
– **Regular Expressions**
    – You can test your regular expression on this site: RegExr: Learn, Build, & Test RegEx
    – You can use regular expressions in the `extract()` function in Kusto. For example, this code will 
extract and convert to a double the response time from the container output showed above:
        “`sh
        todouble(extract(@”CreateTripPoint ([0-9.]*)ms”, 1, LogEntry))
        “`
– **Application availability and responsiveness**
 
Additional Reading

Challenge 7: Integrating quality and security gates

**Resist the initial temptation to rush on the keyboard! This is the time to pause and think as a team 
about your end-to-end deployment process that you would implement in this company.**
**Reminders:**
– Use an InPrivate/Incognito window in your browser to avoid any confusion with any other credentials 
that you may use to access Azure resources.
————–
At the completion of Challenge 5, you implemented workflow(s) to perform unit testing, continuous 
integration, and Blue/Green deployments. You performed basic gating to verify that the staging 
environment was online before performing the Blue/Green swap.However, there are alway opportunities 
to improve automated quality and security gates.
Depending upon business need, it is common to perform one or more of the following in your 
deployment workflows:
– **Dependency Scanning** – Open source components are used in the majority of modern 
applications. This greatly accelerates development but can also introduce vulnerability or license 
issues. Dependency scanning can check for issues as part of your code commit or during CI/CD 
workflows.
– **Code Coverage** – Unit Tests can provide a safety net and indicator of code quality. However, unit 
tests require ongoing maintenance and can provide a false sense of security. Code Coverage helps you 
understand how much of your code is being tested and monitor whether testing declines as code 
changes.
– **Static Code Analysis** – Computers are useful in identifying patterns, including patterns in code 
that may be vulnerable, difficult to maintain, perform poorly or are otherwise buggy. Static Code 
Analysis can identify “code smells” and improve the value of your code reviews.
– **Variant Analysis** – Like Static Code Analysis, Variant Analysis can identify “code smells” and 
improve the value of your code reviews. However, Variant Analysis can also reduce false positives and 
otherwise provide more meaningful insights to your code.  Variant Analysis has proven extremely useful
 in security analysis scenarios.
– **Integration Testing** – After deployment to a pre-production environment, automated tests can run against an integrated system, verifying not only 
“units” of code but also the completely integrated system.
– **Load Testing** – Code changes can cause unexpected performance issues. Load and Performance 
testing enables you to measure the scaling or performance impact of code changes.
– **Manual Approvals** – Although manual intervention is against some of the core tenants of 
automation, it is still required in some scenarios. In this case, moving from a pre-production 
environment to production requires the approval of a specific individual or team.


Challenge

In this challenge you will plan and improve your workflow to support ***one or more*** quality or 
security gates. You must complete implementation of one of these enhancements and should be able 
to share the design of a second enhancement.
– *Dependency Scanning* is frequently performed as part of your commit workflow or during PR or CI 
builds. If you're using GitHub, implement security alerts and automated security updates. For other 
repositories, integrate Whitesource Bolt or another vulnerability into your PR or CI workflow.
– *Code Coverage* is generally performed during unit testing to measure how much of your code is 
actually tested. Integrate code coverage reporting into your PR or CI workflow. You may also 
implement a gate such that the workflow fails if the amount of code coverage falls as code is changed.
– *Static Analysis* is generally performed as part of PR or CI builds and reporting is used to support 
peer reviews. Different computer languages may leverage different tools for static analysis.
– *Variant Analysis* is more intensive than static analysis an is frequently decoupled from the pipeline. 
 Semmle can be configured to support variant analysis on your public repositories.
– *Integration Tests* are generally run against a pre-production environment to verify your components integrate well across your code base. The 
technology will be different than unit testing (e.g., Selenium et al) and should be implemented after 
deployment.
– *Load Tests* are similar to integration tests in that they are run after deployment. Some 
implementations force hard gates when performance degrades, and others simply provide feedback 
for manual approvals.
– *Manual Approval* is very common in enterprise environments, relying on a specific individual or 
team to review an approve a pre-production deployment before pushing to production.
> **Note**: Different source repositories and orchestration tools will have different mechanisms to 
implement these capabilities. Depending upon your tools, some of these may be significantly easier 
or more difficult to achieve.


Success Criteria

– Demonstrate one or more of the above enhancements. This will frequently require pushing changes 
through your workflow and showing and explaining the steps. It may also require demonstrating 
integration with external tools.
– For a different enhancement, explain a design, the specific tools that you would leverage, how they 
would fit into your process, and where you would integrate them.
## References
– Dependency Scanning
– Code Coverage
    – CoverAlls
    – CodeCov
    – Jacoco
– Static Code Analysis
– Variant Analysis (Security)
– Integration Testing
– Load Testing
– Manual Approvals
Challenge 8: Implement phased rollout with rollback

**Resist the initial temptation to rush on the keyboard! This is the time to pause and think as a team 
about your end-to-end deployment process that you would implement in this company.**
**Reminders:**
– Use an InPrivate/Incognito window in your browser to avoid any confusion with any other credentials 
that you may use to access Azure resources.
————–
The executive committee is hesitant to deploy new features and would like to be able to validate any 
changes on a small subset of customers before deployment into production.


Challenge

Your challenge is to implement a solution that enables the phased rollout (or percentage based, also 
sometimes referred to as canary) of a new version of the API of your choice.
If required, revise your deployment strategy relative to how you will perform the phased update of 
each API to its respective web application.
> **Note:** It may be a good idea to step back and evaluate your overall strategy at this point.
Update your existing pipeline to implement a mechanism to facilitate the gradual switching of your user 
base to the new version of the application while simultaneously monitoring the health of the new 
version of the API. The updated pipeline flow should include at least one manual approval and one fully
 automated step.
Your updated pipeline must include the ability to roll back to the previous version of an API if an issue 
is detected during phased rollout. If an issue is detected at ny point during your release automation, 
an issue relating to the cause must be created in your backlog.


Success Criteria

– Explain your updated strategy and the associated technical details thereof to your coach.
– Demonstrate that a change in the code of your chosen API is deployed with a phased rollout to your 
coach. Walk through each phase of your process and explain the state of your deployment.
– Demonstrate your ability to automatically rollback to the previous stable version and the creation of 
the associated issue in your backlog.

Stretch goal
If you have implemented challenge 6, automate your rollback based on monitoring the environment.


Reference

– Topical References
– GitHub
– Azure Pipelines

Scroll to top